


Quick Jump:
Adjusting the Resolutions
One last tip: once you've run RefreshForce and removed any dangerous video settings, it's time to adjust the remaining supported resolutions. This is where the Nokia Monitor Test program comes in handy (it can be found in the RetroBlast File Downloads section). This program provides you with a nice grid that you can use to fine tune both the overall picture size and the geometry for each supported resolution.

The Nokia Monitor Test Program in Action
Using the "Quickres" utility provided with the AVGA card drivers (it shows up as a Galaga icon in your system tray), select each of the listed resolutions, one by one. Using the monitor's control panel, adjust each resolution's settings so that the image is centered and fills most of the screen. You may need to fine tune some of the display's geometry settings as well (parallelogram, trapezoid, etc.)

The Betson/Kortek Control "Panel"
Note: you probably shouldn't expand the screen image "wall to wall" on the tube. Unlike PC monitors, arcade monitors don't stay as nicely focused from edge to edge. Convergence problems are most common along the edges of the display area, as are focus problems. You don't have to use every square centimeter of available tube space for your game display, and the picture may look better if it's slightly smaller.
A Word About 800x600 Mode
One more thing: I really recommend you stick to 640x480 for your time in Windows (and your MAME front end). While the Betson Multisync officially supports 800x600 resolution, and the Wells-Gardner D9200 unofficially supports it, 800x600 mode on an arcade monitor just won't provide a good picture.
The main reason is that the dot pitch on the tubes used in both of these monitors really can't support a screen size of 800 dots by 600 dots, and the end result is that the display in 800x600 mode is going to be blurry. It may work, and it won't hurt your monitor, but you're going to get a headache if you try and stick to 800x600 mode, especially if you're trying to read text in Windows.
Stick to 640x480 for Windows and your front end, and save 800x600 for such things as the vector games in MAME, which can benefit from the increased resolution (and will benefit from the blurriness, as it acts as a natural "antialiasing" for the vector lines).
MAME Prep
Okay, you've got the right hardware, and Windows is now set up and safe: the final step is fine-tuning MAME to look its best with your new hardware. Surprisingly, while MAME and the AVGA card can produce some stunning results using just the default settings, you're going to want to fine-tune those settings for many games, especially vertical games (such as Pac-Man, Centipede, and so on).
Once again, I turn to the "quick and easy" (read: lazy) method of doing something. In this case, you'll want to get the "MAME Resolution Tool," a utility designed by Steve Lilley-Hopkins, the author of the great MAMEWAH front end.
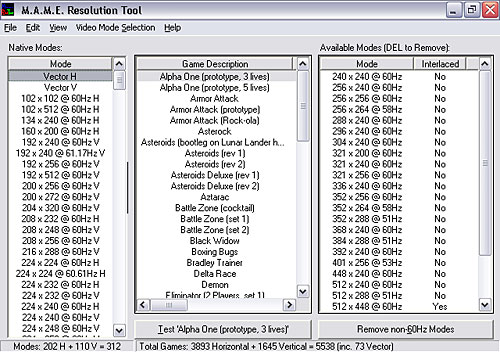
The MAME Resolution Tool
The MAME Resolution tool shows all of the resolutions used by the games in MAME in a column on the left-hand side of the screen, and shows all of the resolutions supported by your video card on the right. This allows you to quickly play matchmaker, especially when a MAME game has a unique resolution not natively supported by your video card.
This utility makes it a breeze to adjust each and every MAME game for the best possible video display on an arcade monitor. You can adjust everything globally, by each resolution, or by individual games. Plus, you can preview and test your settings and then adjust them until you've found a combination of video options that you like.
The nice thing is that you don't have to tweak each individual game, but can instead fine-tune a game resolution using just one game in that resolution, and then apply those settings to all games that share the same resolution. Once you've got all the games in MAME set up the way you like, a simple click of a button will let the MAME Resolution Tool write out individual .INI files for every since game in MAME, each with their ideal video settings.
Trust me, if I had to individually adjust the individual .INI files for all 5,000-odd games in MAME I'd probably just skip the whole thing!
One more thing: be sure and read the "readme.txt" file that is included with the MAME Resolution Tool, as Steve offers a lot of good advice on how do such things as setting up a default resolution and how to adjust the program for the best automatic results.
A few general tips on MAME video settings for arcade monitors with the AVGA:
- Make sure that hardware stretch is turned off. There's no sense in having a monitor that can display razor-sharp arcade graphics if the video card is blurring everything by trying to stretch it. One exception: if you have a game that doesn't quite match any of the AVGA's default video modes, you'll probably have to use hardware stretch to get the game image to fit the screen.
- For vertical games, concentrate on the vertical resolution: try and find a matching vertical resolution in the list of the AVGA card's available resolutions, then worry about finding a horizontal resolution that looks "right". If you can't find a match, try and find a vertical resolution that is exactly double the native vertical resolution (i.e., if a game has a vertical resolution of 240 pixels, find a mode with a vertical resolution of either 240 or 480 pixels).
- If you see a "ripple" effect on the display when a game scrolls, enable "triple buffering" for that game. Don't ask me why, but this option almost always fixes the problem. Triple buffering can cause sound distortion on some games, however, so don't make it a global setting.
- Don't worry about the "match refresh rate" option, as the AVGA card's modes are already very close to most game's native refresh rates.
- Use the MAME game info screen (shown by default when you launch a game) as a visual tool to check your screen settings: that white box around the game info is the screen area that will be used by that game. Make sure you can see all four sides of the white box.
Conclusion
Setting up and fine-tuning an arcade monitor for use with MAME can seem like a lot of tedious work (and trust me, I avoid tedious work as much as possible!), but luckily you only have to do it once. This may seem like a lot of steps, but the end result is worth the effort, trust me.
I used to be indifferent to the quality of the display provided by MAME: "they're all low-resolution games," I thought, "how can they look any better?" Then I saw an arcade monitor in action with MAME, and I literally saw the light. If you're serious about retrogaming, make the effort. You'll smile every time you fire up your favorite game.
