


Comparison of Two Types of Linear Thermoplastics
(or: I used Plexiglas for My MAME Project)
by Will Yen
May, 2005
First, a disclaimer: I do not profess to be an expert in anything. I am in the process of finishing up my MAME cabinet project (two cabinet built simultaneously; one for me one for my friend). What I will do is to present you with some of the properties of acrylic and polycarbonate, suggest tools/techniques on working with them and detail how I went about working with acrylic. Most of the info rmation is from research I did prior to selecting acrylic for my MAME project. This is not meant to be a comprehensive guide. I’m sure there are other ways to accomplish the same tasks.
Acrylic vs. Polycarbonate: Round 1
(What’s
the Difference)
There are many different brand names for acrylic. Among them are Acrylite, Lucite, Perspex, and Plexiglas. There are also many different brand names for polycarbonates. Among them are Lexan, Makrolon, and Tuffak.
Here are some differences I was concerned with:
- Light transmittance for acrylic is 92% and polycarbonate is 85%. For my purposes this difference is negligible.
- Acrylic is about 10 times stronger than glass and polycarbonate is about 30 times stronger than acrylic. Please note these are rule of thumb comparisons. Manufacturers offer many different grades of acrylic and polycarbonate which exhibit different properties. Just check the Atoglas site to see how many different types of Plexiglas they produce.
- Acrylic is more brittle and is harder than polycarbonate. As a result, Acrylic resists scratches better and needs to be handled more carefully when cutting and drilling. Polycarbonate is much more impact resistant (will absorb more kinetic energy before shattering). One of the results of this physical property is polycarbonate is less prone to cracking when being machined.
Here are some test results from the Plexiglas properties brochure for Plexiglas G sheets performed on Plexiglas that are 14” x 20”.
- If you threw a baseball at 47 mph, then you would be able to break a piece of Plexiglas that’s .118 inch thick (a little less than 1/8 th inch).
- If you can get your fastball up to 84 mph, then you can break .236 inch Plexiglas.
- If you can break polycarbonate, then you mig ht want to consider a career as a major league pitcher.
Acrylic vs. Polycarbonate: Round 2
(Tools
and Techniques)
Before you start cutting and drilling, make sure all your tools are sharp. Also, try to keep the protective film on the plastic as long as possible. Always perform a test cut or drill a test hole to see if you get the result you’re looking for. This way you can evaluate your technique and if your existing tools are appropriate. When using power tools always clamp your work pieces to minimize vibration and of course use appropriate safety equipment.
Cutting by hand:
Acrylic
Acrylic 1/4” thick or less may be cut using a utility knife. First score along the cut line using a straight edge (clamped in place) about 8 times. You need to cut through about 1/3 of the way through the sheet before trying to snap it. Then clamp the sheet under the straight edge with the cut line at the edge of a table (the edge of the table should be square). The objective is to prevent the sheet from moving or flexing while you apply sharp downward pressure evenly across the length of the cut line to propagate the notch you made. If you did not cut deeply enough, the cut on the opposite side of the scoring could be outside the desired cut line by as much as the thickness of the material.
Polycarbonate
It is not advised that polycarbonate greater than 1/16” inch thick be cut in the manner described previously. The force needed to propagate the notch is too high. Ordinary sheet metal shears can cut polycarbonate sheets up to 1/8” inch thick.
Cutting with circular saw/table saw:
Acrylic & Polycarbonate
For best results, use carbide tipped blades with a triple-chip tooth design, rake angle of 0 to 5 degrees, and teeth count of greater than 5 per inch. High speed steel blades that have teeth of even height, and a teeth count of greater than 5 per inch can also be used.
Here’s a couple of pictures of plastic cutting blades:

Plastic Cutting Blade

Close up
Use a guide/straight edge to ensure a straight cut. Both the work piece and the guide should be clamped down to prevent any movement when cutting. Blade clearance should be no more than 1/8” when performing cuts. Make sure blade speed is up to maximum before cutting. Acrylic will dull blades quickly. Polycarbonate is a little softer than acrylic and will be less prone to cracking. If you’re planning to do a lot of plastic cutting, invest in a plastic cutting blade.
Cutting with router
Before cutting with a router, please note that the feed direction for cutting on the outside edge is counterclockwise. The feed direction for cutting on the inside is clockwise.

It is recommended to use double fluted bits for work around the edges and single fluted bits for inside circle routing. Carbide tipped bits will work better. Once a bit gets dull you mig ht get some melting at the cutting edges. The edges can be easily smoothed out (see Final Round for finishing tips) if melting occurs.
When cutting a large sheet into 2 pieces with a saw or router I would suggest keeping some wood (of the same thickness) underneath both pieces to help support the work piece when cutting. The two wood pieces will form a channel through which the router bit can pass through. Use a guide for a straight cut. Clamp everything to down your workbench to prevent movement and minimize vibrations.
When trimming pieces, put the work piece at the edge of the workbench with as little over hang as possible. Use a guide for a straight cut. Again, make sure everything is clamped properly (it should not move when being worked on) and check clamp placements for possible interference with your power tool.
A flush trim bit with a ball bearing guide is useful to cut out control panel overlays. The control panel is used as a template for cutting the plastic. Here are two types of flush trim bits:
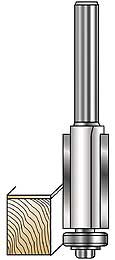

Flush Trim Bits
Once you have the holes for the buttons all drilled in your control panel, the router can also be used to create the holes for the buttons on the control panel. You’ll be using each hole on the control panel as a template for the corresponding hole on the overlay. Secure the plastic overlay to the control panel (make sure the pieces will not move). Drill a pilot hole (larger enough for the router bit to enter freely) and then use the flush trim bit to finish the hole in the overlay.
Cutting with jigsaw
Use a fine blade (there are blades made for cutting plastic) or use a metal cutting blade. Use a guide (for straight cuts) and secure the work piece when cutting.
Drilling
First, drilling small holes (for screws, bolts, etc.). For best results on acrylic, use a bit specifically designed for this task. They do not cost too much. For the most part, polycarbonate can be worked using regular woodworking bits. Regular twist drills with and cutting angle of 60 to 90 degrees will work well. You can modify ordinary bits (if you have any old dull bits lying around) by flattening the cutting edge. As always, make a test hole or two to make sure you’re going to get good results. These tips assume that you’re using a hand drill.
When drilling, the drill bit should scrape the plastic rather than bite into it. Two continuous spiral chips should emerge from the hole as you drill. Generally, the larger the hole being drilled the slower the drill speed should be. Don’t let the plastic heat up too much. Back off the bit occasionally. To drill holes in acrylic larger than 1/8 inch with regular bits, you mig ht want to start with a 1/8 bit and work your way up to minimize the chances of cracking.
One of the most crucial elements is drill speed. Having a variable speed drill will help avoid cracking your work piece. You can adjust your drill speed to suit the bit you’re using. Keeping a scrap piece of wood underneath your work piece will help prevent cracking. In addition, clamp your work piece so that it doesn’t move as you work on it.
To cut larger holes, here are some drill bits you might use (i.e. for buttons):
- Spade – Even though it is not recommended to use this bit on plastic, it can be used if you’re careful. Use a variable speed drill. Make sure the bit stays perpendicular to the work piece. Go slow and don’t press too hard. After the outer edge of the bit cuts half way through the sheet, turn the sheet over and complete drilling to get a smooth hole.
- Forstner – Use a variable speed drill. You’ll get the best results when used with a drill press. But, a hand drill can be used successfully. Using carbide tipped blades is recommended. Otherwise you may be sharpening your forstner bit quite often. A cutting lubricant (such as 3 in 1 oil) may be necessary to reduce friction between the side of the bit and the plastic to prevent the material from melting. Keep the bit perpendicular to the work piece. Go slow and don’t press too hard.
The following is a table outlining possible problems and solutions when cutting plastic:
Chipping |
Melting |
Current feed rate is too fast; slow feed rate |
Current feed rate is too slow; increase feed rate |
Check for bent teeth |
Check for dull blade |
Check teeth to ensure uniform height |
Incorrect blade angle; use different angle |
Make sure material is properly supported |
Make sure material is properly supported |
Acrylic vs. Polycarbonate: Final Round
(Wrap
Up)
Finishing Touches
If your work piece turns out just a little too large, I recommend trimming by hand. Get a small wood planer (adjust the blade to produce a smooth shaving action) to trim the edge. The planer is inexpensive and happens to be excellent at trimming monitor bezels too. A plastic pocket planer can also be used for trimming.
To get a smooth edge, sand paper can be used. Start with a coarse grain and work your way up to 600 grit paper. The edge can be then polished using plastic polish.
Cleaning and Maintenance
Acrylics should be dusted gently with a clean soft cloth before cleaning. Then the surface can be wiped carefully with a wet cloth or chamois. Grease and oil may be removed with kerosene or hexane. Solvents such as acetone, benzene, fire extinguisher fluid, gasoline, and lacquer thinners will attack the acrylic and should be avoided. In addition, window cleaners and kitchen cleaning compounds are not to be used.
Polycarbonates may be exposed to a variety of materials without ill effects. Among the items compatible with Tuffak (according to the Tuffak A data sheet) are petroleum ether, ethyl alcohol (96%), detergents, fruit syrup, beer, chocolate, hydrochloric acid (20%), sulfuric acid (50%), tomato juice, vodka, and mineral water. Among the stuff to avoid putting on polycarbonates are ammonia, gasoline, hydrochloric acid (25%), lacquer thinner, methyl alcohol, and turpentine.
Minor scratches on acrylic and polycarbonate can be polished and removed by using plastic polish (i.e. Novus #2, Novus #3)
To sum up, dust (acrylics and polycarbonates) gently with a soft clean cloth before cleaning. Clean with a damp cloth and/or use soap/detergent mixed with water (don’t pour the water on your cabinet unless you have a waterproof cabinet). They may also be cleaned with a polish such as Novus #1 or Brillianize. Don’t put any kind of solvents on these plastics.
What I Spent 5 Months On
(or Why I Wrote This Article)
I am finishing up two cabinets. One is for me and the other is for my friend. For the cabinets we used 2 pieces of 1/8” acrylic to hold the marquee and 1/8” gray tinted (this color corresponds to 2064 Gray Plexiglas) acrylic to cover the monitor. I have access to both a circular saw and a router. I decided on using the router since buying bits for the router would cost less than buying a plastic cutting blade. I used the router with a two flute plunge bit (I had this bit on hand and decided to try it before ordering the carbide tipped bit and it worked for me) to cut all the pieces. Trimmed the pieces using the hand planer and then sanded them smooth. Didn’t have any problems using the router. I didn’t crack a single piece of acrylic. I had a little bit of melting when performing the cuts. But it was nothing a little scraping with the back of a knife and a little sanding couldn’t take care of. I cut my pieces slightly large and trimmed to the correct size using a planer. You can always trim the piece to fit. It’s much harder making a small piece bigger.
I spent a lot more time trying to figure out whether to use acrylic or polycarbonate in my cabinet than time actually cutting the plastic itself. I thought it mig ht be useful to others to get some of my research and experience down on paper before it all leaks out of my brain. Hope this helps.
Note on IR data transmission
For those of you putting a television (or any IR capable device) behind either acrylic or polycarbonate, I have some numbers for 1/8” inch thick materials.
Material |
IR Transmittance (percent) |
Colorless acrylic |
92 |
2064 (Plexiglas number) gray acrylic |
48 |
2404 (Plexiglas number) bronze acrylic |
52 |
Colorless polycarbonate |
92 |
7113 (Lexan number) gray polycarbonate (similar to color 2064) |
70 |
5109 (Lexan number) bronze (similar to color 2404) |
75 |
2711 (Plexiglas number) deep red semi-opaque acrylic |
85-90 |
Here’s a listing of information sources I used for this article:
- Atoglas – web site for Plexiglas and Tuffak www.atoglas.com
- Cyro – web site for Acrylite brand acrylic www.cyro.com
- San Diego Plastics, Inc. – plastic distributor/fabricator www.sdplastics.com
- Select Plastics, LLC - plastic distributor/fabricator www.selectplastics.com
- McMaster-Carr – distributor of many items including linear thermoplastics www.mcmaster.com
- Professional Plastics – plastic distributor (I ordered from here. This is not an endorsement, just a fact) www.professionalplastics.com
- United States Plastics Corp. – plastic distributor (They also carry some plastic cutting tools) www.usplastic.com
- Novalog, Inc., Plastics for IR Data Transmission Windows www.novalog.com
