


by Kevin Steele
January, 2005
Overview
After I got my MAME arcade cabinet finished and acquired a couple of pinball machines, I thought my quest for the "arcade experience" was complete. But something was missing: the "plunk" of an inserted coin to start a game. I discovered that winning a replay or a match on my pinball machines was an empty experience if the game was set on free play. I mean, what's the point? Where's the reward?
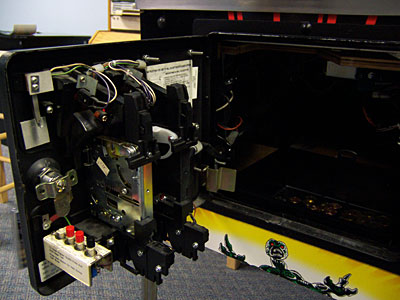
A pinball coin door
Thus was born my quest to convert all of my machines over to token operation. I had originally thought about setting the games up for quarter use, but I suspected that the quarters would begin to vanish as neighborhood kids came to visit. Besides, tokens just make the experience even more "arcade-like."
Swapping the Mechs
The first step in setting up my machines for token operation was replacing all the quarter coin acceptor mechanisms ('mechs') in the coin doors with ones designed for tokens. This turned out to be surprisingly easy: the coin doors are designed to allow quick "swap-outs" of coin mechs so that an arcade operator can change a game over for token or currency operation.
A quick search on Happ Controls found both metal and plastic coin mechs, for a variety of coin and token sizes (.882, .900, and .984" token sizes). First, I had to decide what token size I wanted to use.
I decided on .984 tokens for a variety of reasons: they're the closest in size to a quarter, are the size I found most often in the arcades I visited (Chuck E. Cheese uses .984 tokens, for example), there was project going on in the BYOAC forums to design some custom .984 tokens, and I also planned on buying a Pachislo slot machine, which uses .984 tokens.

.984 Tokens with a US quarter for comparison
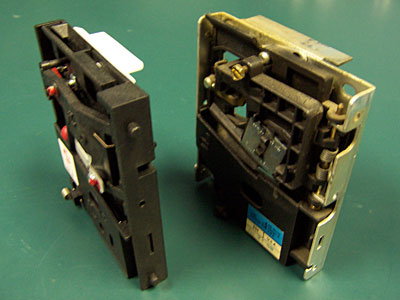
Plastic and metal coin mechs
I chose the plastic Ultimech mechs because of price: about $14 each, compared to close to $30 for each metal coin acceptor mech — I was going to need two mechs for each machine, so it adds up fast. Note that there is a technique for modifying your existing mechs so that they accept quarters and tokens (or nearly any other coin). I chose to go with new mechs because I wanted "token only" operation.
Once the mechs arrived, it was very easy to swap out the old mechs for the new ones. The coin doors on my machines had one of two latching mechanisms: a thumbscrew with a sliding latch, or a flap that snapped over a post on the mech.
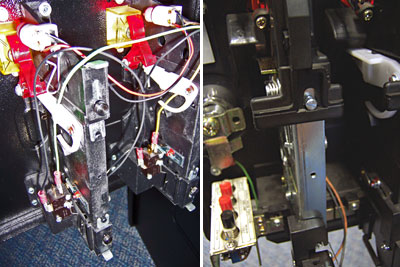
Latches: Thumbscrew (left) and Flap (right)
To swap out the mechs, you simply release the latch, slide the mech up and out to the right, the slide in the new mech, making sure that the coin entry lines up with the coin slot from the front of the coin door. Pop the latch back into place, and you're done. It really couldn't be easier.
With the pinball machines, all I had to do was adjust some of the pricing settings so that the "cost" of each game was just one token. For the MAME cabinet things were a bit more complicated, since the coin door was not even wired up to the encoder in my control panel, and thus couldn't register any coins.
Converting A MAME Cabinet
The next step, obviously, was to wire up the coin mechs in my MAME cabinet so that the IPAC encoder registered a credit when a coin was inserted. To do this, I needed some wire, four .187 or .25" quick disconnects, and a crimping tool. Luckily, as an arcade enthusiast I had all of this just laying around (I really should clean up my shop!).

Parts needed to wire up a coin door
Quick disconnects are a great invention: they allow quick, easy electrical connections to be made without soldering, and they can be removed if necessary. Since the coin doors used microswitches with quick disconnect tabs, the entire wiring operation would be easy and reversible if needed.
First, I measured off three lengths of wire, one for each of the coin switches and one for the common ground wire. These wires needed to be long enough to reach from the coin door to the IPAC encoder in the control panel, along with some slack for cable routing. I used approximately 5' lengths. I also color coded the wires: green for coin input 1, yellow for coin input 2, and black for the ground wire.
For the two coin door wires, you simply need to crimp a quick disconnect on one end of each wire (the other end will be screwed into a terminal on the encoder. Crimping a quick disconnect is easy once you've got the hang of it: strip about 1/8" off the end of the wire, slide it into the quick disconnect, then use the crimper to "squish" the two together. It's quick and produces a very solid connection if done correctly.
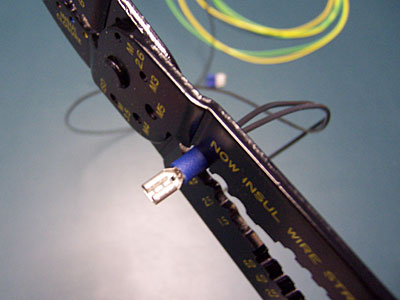
Crimping on a quick-disconnect
The ground wire required a "daisy chain" connection, so that you could connect both coin switches to the ground using only one wire. To do this, I cut an additional 12" piece of wire (just enough to go up from one switch, over one of the mechs, and back down to the other switch) and then crimped the two wires together using one quick disconnect. One more quick disconnect on the end, and the ground wire was finished.
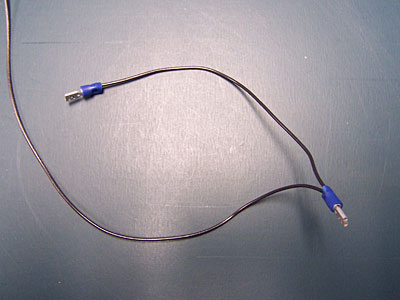
The ground wire
I used a few zip ties to hold everything together, and the cable was finished. All that remained was to actually install it.

The completed coin input cable
