


GameCab Inc. LED Driver Board
Review by Kevin Steele
May, 2005
Introduction
Adding LED lighting to a control panel adds that extra arcade "bling" that helps give your MAME cab a true arcade machine vibe — let's face it, arcade machines were not known for being subdued. The flashier the better, and since MAME even includes support for using the keyboard LEDs as indicatior in some games, you might as well take advantage of it.
Of course, it's not quite as easy as just plugging in LEDs. Each LED will require a limiting resistor (or you'll burn it out), and you'll need to figure out what value of resistor to use and then wire everything up. Luckily, GameCab Inc. has come out with an LED Driver board that greatly simplifies the process.

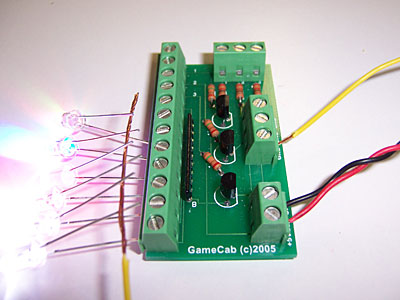
The GameCab Inc. LED Driver Board
The LED Driver board is preconfigured for ultra-easy wiring. All of the correct limiting resisitors are already on the board: all that is required for you to use it is to attach your LEDs to the appropriate spots on the easy-attach terminal blocks.
The board supports the IPAC keyboard LED output (3 LEDs) plus up to 9 additional "always on" LEDs. The board includes terminal blocks for connecting the IPAC outputs, +5V DC power, and three ground points.

Dedicated IPAC Keyboard LED Connections (Labeled 1, 2, 3 above)
For the keyboard LEDs, LED Driver is designed to connect to the IPAC's header pins, which includes output for the three keyboard LEDs used by MAME (Caps Lock, Scroll Lock, and Num Lock). The board is designed for 5V DC power, which you can supply through the IPAC (see diagram below) or directly from your PC's power supply (with an appropriate cable).

IPAC Header Connections (Diagram Courtesy of Ultimarc)
For testing purposes I decided to use a direct PC power connection, using an adapter cable I had handy (I've got lots of spare PC junk squirreled away which always proves handy...eventually ;-)

Direct PC Power Supply Connection
The power cable uses the red (+5V) and black (Ground) wires from a standard PC power connector.
The advantage of using a direct PC power supply connection is that the LEDs will turn off when the PC does — most modern PCs keep supplying power to the USB and PS/2 ports even when shut down, to allow for keyboard power buttons. This means that if you use the IPAC's +5V power connections, your LEDs will most likely remain lit continuously, even if the PC is turned off.
For this test I had ordered a variety of ultra-bright LEDs from SuperBrightLEDs.com, including three different intensity white LEDs (18000, 10000, and 8000 mcd), a "Super Red" and "Super Blue" LED, and a tri-color changing LED (which cycles every second from blue to red to green). I connected them up directly to the board, although in a "real-world" situation you'd want to connect wires to the LEDs and then connect the wires to the terminal block.

Testing Ultra-Bright LEDs
The results were, as expected, dazzling. Ultra-bright LEDs are great little lights, putting out a lot of illumination with very little heat.
The LED Driver Board in action

LEDs Used (Left to Right):
Tri-color, Ultra-Blue, Ultra-Red, and Ultra Whites (8000, 10000, 18000
mcd)
Conclusion
The board is well designed and constructed: about the only nit I have to pick is the lack of mounting holes on the board, meaning you'll need to use double-sided foam tape to mount it in your control panel.
For only $13, the LED Driver board is a handy way to simplify wiring up LEDs on your cab. Yes, you can wire all this up on your own, but you'd pay over $13 in parts and still not have the nicely integrated solution offered by this board.
