


Review by Kevin Steele
January, 2005
Overview
I love reviewing control panels: while they all strive to provide a full set of arcade controls for MAME and other emulators, each takes a subtly different route to that goal. It's sometimes a game of minute differences, and it intrigues me to see the varied approaches of different vendors to a common goal.
Take, for example, the Stinger Control panel from Game Cabinets, Inc. It's a full-size control panel, with a variety of different controls. It's similar in appearance to other control panels, but not identical. And it's got quite a few unique touches all its own.
The Stinger
Looking It Over
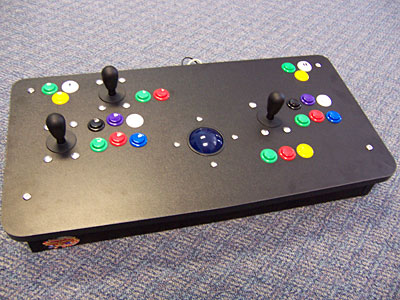
The Stinger has got a full complement of MAME equipment: two eight-way joysticks, a 4-way joystick, trackball, and even double pinball buttons on each side of the panel. Powered by the Ultimarc MiniPAC, it's ready for "plug and play" action in MAME, once you plug in the USB cable for the MiniPAC and the PS/2 cable for the trackball.

The side-mounted pinball buttons
The Stinger's control layout has a few twists. For one, the player one and two button sets are arched slightly. In addition, buttons 1-3 are on the bottom, while buttons 4-6 are on the top row (this is similar to the approach by Treyonics). Player One and Two Coin and Start buttons are placed on each top corner, along with dual Pause buttons (a nice touch!)
The joysticks are Happ Supers and provide a nice, snappy feel. While I'm still in love with the Happ Perfect 360 optical joysticks, these aren't a bad choice either. The joysticks are all bolted to the panel from above, leading to some unsightly bolt heads on the panel surface, something that I felt really detracted a lot from the overall appearance of the Stinger.

Arched button layout and joystick bolt mounting
The shape of the Stinger is fairly square, with only the top corners of the top panel being rounded. It's a utilitarian but functional look.
The overall construction of the cabinet is excellent. It uses 3/4" Formica laminated MDF for the frame, with the top surface being a nice textured laminate that helps hide fingerprints. The inside of each of the MDF panel is also coated, with what appears to be a melamine treatment. It's an unusual and classy touch.
One more unique place for laminate was the edge of the top panel, which is laminated instead of using the traditional T-molding. I can't say whether this is better or worse, just different. It doesn't feel as "rubbery" as T-molding, nor does it have the rounded shape. It certainly looks nice, and I suspect it may be more durable.
Dude, Where's the Trackball Plate?
One of the things that first caught my eye on the Stinger control panel was the trackball mounting plate, or rather the lack of one. The Betson Imperial trackball is mounted right into the surface of the control panel, with some careful routing of the underside to bring it up to the right height. This produces a very nice integrated look, with only the plastic "lip" around the ball raised above the surface of the panel. There are four visible mounting bolts, but they don't annoy me as much as the bolt heads for the joysticks.

A plateless trackball mount
The Betson Imperial trackball is nice — not quite as nice as a Happs trackball, but still not bad. The ball does not "roll" as smoothly or as long as a Happs Trackball does, but I didn't notice any tracking problems during gameplay. The Betson Imperial trackball is a PS/2 trackball, which means it's not "hot pluggable" — if you want to plug the Stinger into your desktop PC for some retrogaming action, you'll need to power down the computer first.
The use of the PS/2-based Betson trackball is a slightly puzzling design choice, since the Stinger uses the MiniPAC encoder, meaning it's already got a built in trackball encoder. A regular arcade trackball could have been used instead, eliminating the need for the separate PS/2 trackball cable coming out of the back of the Stinger.
Built for Arcade Cabs
The Stinger has a few design characteristics that just screamed out "cabinet mount" to me. For one thing, the back edge of the top panel is mounted in line with the back panel, allowing the Stinger to be mounted flush when installing in an arcade cabinet.

A flat backside
The other design choice that seems chosen for arcade cabinet mounting is the decision to route the cables out of a hole on the bottom of the control panel, towards the back. This design choice also allows the panel to be mounted flush up against a mounting plate on a cabinet, while at the same time guiding the cables downward into the guts of a cab for connection to the hidden PC.

The cables are routed out the bottom
The overall size of the Stinger seems fine-tuned for cab use. At 28.5" W X 13.75"D X 5" H, it's just about the perfect control panel size for a 27" cab. Unfortunately, this size also means that there have to be a few "overlap" areas between the different sets of controls. To be specific, the 4-way joystick is mounted directly above the player 1 buttons, and the three trackball buttons are mounted directly below the player 2 joystick.
Now whether this is a problem or not depends on how you play. When I'm standing in front of a control panel, it's no problem at all — my arms are up and well above the buttons. However, if I'm sitting on a stool, or have the panel sitting in my lap, my arms are at a much lower angle. I found my forearms would brush against the buttons in these situations, something that was a bit annoying, especially when using the 4-way joystick.

The trackball buttons under the player 2 joystick
Control panel layout is as much an art as it is an exercise in logistics, and I have to admit I'm a bit stumped on how else to fit all of these controls into the space allotted by the Stinger's relatively compact dimensions. It's smaller than a SlikStik classic, but they're both full-sized panels: kind of like a battleship sitting next to an aircraft carrier.

The Stinger Compared to a SlikStik Classic
