

Wiring Up Arcade Cabinet Speakers
By Kevin Steele
May, 2004
Introduction
An arcade game just isn’t the same without the sound — asteroids, for example, is pretty boring without the “peeow” of gunfire, the rumble of exploding rocks, or the “bump-bump-bump” heartbeat sound in the background.
When it came time to add sound to my MAMEframe2 arcade cabinet, I wanted to make sure the cabinet had a sound system that met the following criteria:
- Loud
- Inexpensive
- Good bass response
- External volume control
- LOUD
Sound Choices
The first component of the sound system I bought was a set of 2.1 PC speakers, specifically the Creative Inspire 2.1 Slim 2600 speakers. I had used this same speaker set with the original MAMEframe, and I had been very pleased with the results.

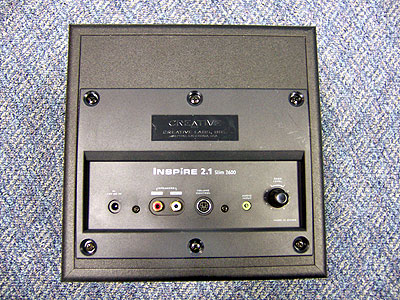
The back panel of the Creative Inspire subwoofer unit
Why a set of PC speakers? Because I already knew they’d interface easily with the PC inside the arcade cabinet, they had an amplifier built into the subwoofer, and because they had an external volume control pod and an adjustable bass level.
The only problem with the PC speaker set, however, was that the two main satellite speakers were too small for the cabinet, both in terms of mounting them and in terms of potential volume levels (I wanted LOUD, remember?). The SlikStik cab was designed for 5.25" speakers, so I went out and bought some approriately sized car speakers, specifically Sony Xplod car speakers, model XS-R1311. The Sony speakers feature a very good frequency range, as they are "3-way" speakers, featuring tweeter, mid-range, and bass components all in one speaker.

Sony Xplod speakers, with and without the speaker grille
One nice additional surprise was the fact that the Sony speakers used a translucent red plastic for the speaker cone, which allowed me to backlight the speakers with the same light used for the marquee. It's certainly not a requirement for a speaker, but good looks are always appreciated.

The Sony speaker installed in the cab
I should point out that both the specific Creative sound system and the model of Sony speakers that I used have since been discontinued, but there are newer versions of both parts available from their respective companies that are equivalent to the models I used in my system.
Things to Watch Out For
If you plan on “mixing and matching” speakers, you’ll want to watch out for the speaker impedance. In my case, the Creative system was designed for 4 ohm speakers, and the Sony Xplod speakers were 4 ohm as well, so everything matched up nicely.
I’m not sure how critical it actually is to match the impedance, since my original MAMEframe used 8 ohm arcade speakers with a 4 ohm amp system, and it sounded fine. In general, though, I think it’s best to make sure everything matches up.
Another thing to watch out for is magnetic influence from the speakers on the monitor. If the magnets in the speakers are too close to the monitor, you may get severe picture distortion, color bleeding, or worse — monitors do not like strong magnetic fields nearby.

The black ring at the back of the speaker is a magnet...a big magnet
The Sony Xplod speakers that I used are not shielded, but the SlikStik cabinet design seems to keep the magnets in the speakers far enough away from the arcade monitor to avoid affecting the picture. If your cabinet has the speakers mounted closer to the picture tube, you may want to consider buying some shielded speakers (Happ Controls sells shielded arcade speakers).
Putting it together
To assemble the sound system, I first mounted the Xplod speakers in the cabinet. Easy enough, except that I accidently held one of the speakers too close to the monitor while I lifted the speaker into place. I ended up with a badly distorted screen, one which I had to clear up with a manual degaussing coil. Like I said, monitors don't like strong magnetic fields. Be careful when installing the speakers if your monitor is nearby!
Next came the task of wiring everything together. The Sony speakers came with a short 12” section of cable for each speaker, with quick-disconnect plugs on one end and bare wire on the other end. The plugs were keyed so that you could only connect the positive terminal to the positive tab on the speakers, and the same for the negative terminal and tab.

The "keyed" Sony speaker connectors
The Creative speakers connected to the subwoofer via standard RCA-style audio plugs, and while I knew I could wire up my own custom cables, I didn’t have any extra RCA male plugs handy. I decided to cannibalize the existing satellite speakers and use their cables.
Since the cables on the Creative speakers did not have a marked positive wire, I ended up having to open up the speaker cases to find out which wire was positive and which was negative. (Luckily, the tabs on the actual speakers had "+" and "-" markings.) Once I had determined the polarity, it was a simple matter of soldering the Sony cable to the Creative cable, matching the polarity of the wires.

Inside one of the Creative satellite speakers
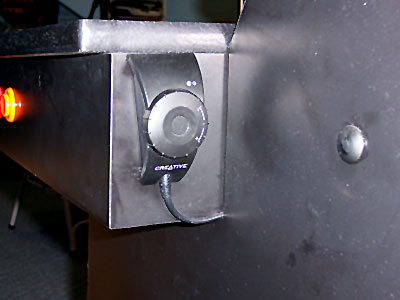
Once I had my custom audio cables, all I had to do was attach one end to the Sony speakers, and plug the other end into the Creative subwoofer/amplifier unit. I plugged in the PC audio output to the subwoofer, and mounted the external volume control pod on the back edge of the control panel on my arcade cabinet.

The volume control pod, mounted
Once all the cables were connected to the subwoofer, I placed it inside the cabinet. While the subwoofer is hidden inside the cabinet, good bass is fairly omni-directional, and you really want to feel it more than hear it. Everything was now ready for testing.

The subwoofer nestled inside the cab
Sounds Good, Looks Good Too
Turning on the MAMEframe, I discovered the sound system was loud. No, make that LOUD. I barely had to turn the volume control up a notch before the cabinet started to rumble. In fact, I had to turn down the bass response because the glass bezel was starting to rattle, and I was afraid I was going to shake the system apart. I had volume to spare, it seemed.
I’ve been very happy with the results of this hybrid sound system. About the only thing I would change if I could would be to get a PC speaker system that had a headphone jack on the external volume pod, as it would be nice to be able to play videogames at night without disturbing the rest of the family.
The Sony speakers can be had for less that $50, and the Creative 2.1 speaker system for about the same price. Basically, for less than $100 I had outfitted my cab with a stylish looking, bone-rattling, eardrum damaging sound system. Mission accomplished.
